Template From A To Z: the Article is Live

The new article in Developer’s Guide named Template from A to Z will guide you through the template’s structure and let you understand how it works. It contains the information on:
- Template Files
- Flash sources
- Pages
- Holders
- Slots
- Modules
- Website Popups
To simplify the process of learning the system for you, we are granting you a ready-made template. As soon as you download it, you will be able to browse through the template’s files, open Flash sources, view the ActionScript code as well as look over the “Template from A to Z” article.

The template’s archive does not contain the MotoCMS Control Panel. But it doesn’t mean that you can’t test this template with the panel – you can get the 30-day trial version of Moto CMS and use it with the downloaded template.

If you use hosting that matches the Moto CMS requirements, you can install the control panel on it. Otherwise, you can use a local server. Please follow the instructions below to install Moto CMS on the local server.
Note: Please use only the versions of WampServer and Zend Optimizer that are mentioned in this article. Moto CMS will not work with the newer versions as it requires PHP 5.2.x.
1. Installing a Local Web Server
We will install WampServer as an example. You can use any web server that supports PHP 5.2.x.
First open the WampServer downloads page and choose WampServer2.0c.exe. When download is complete, launch the WampServer2.0c.exe file to start the WampServer installation. Follow the on-screen instructions. You can choose any destination folder for the server. Please note that you will have to specify this path later in the process of the Zend Optimizer intallation.
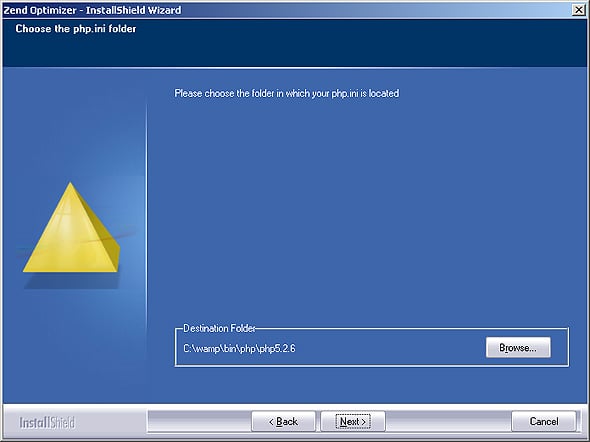
As soon as the installation process is complete, you should enable the curl and the mcrypt php extensions. You will need to edit the php.ini file for that. Its location depends on the destination folder where the Wamp server was installed to. For example, if you did not change the default installation path (C:wamp), the php.ini file location will be “C:wampbinphpphp5.2.6“.
Open php.ini and find the following lines (search for them separately):
;extension=php_mcrypt.dll
;extension=php_curl.dll
Remove semicolons at the beginning of the lines to enable the extensions.
2. Configuring Zend Optimizer
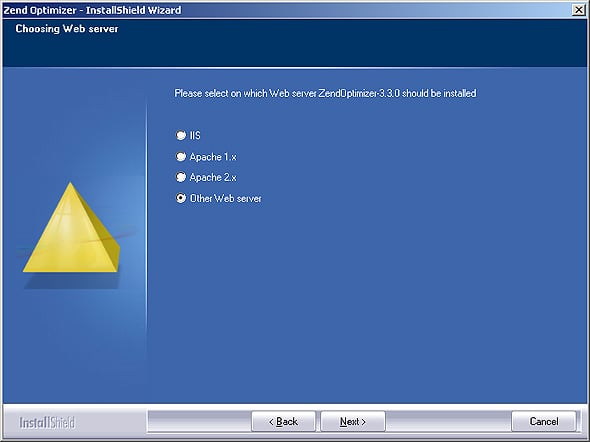
The next step is installing Zend Optimizer. Open the Zend downloads page and choose Zend Optimizer (Runtime for PHP 5.2 and earlier) version 3.3.3. Launch the downloaded file. You can choose any folder to install the program to. When the install wizard asks you which server Zend Optimizer should be installed on, choose “Other Web Server”.
Then you will be asked to specify the php.ini file location. This path has already been mentioned in the first step.
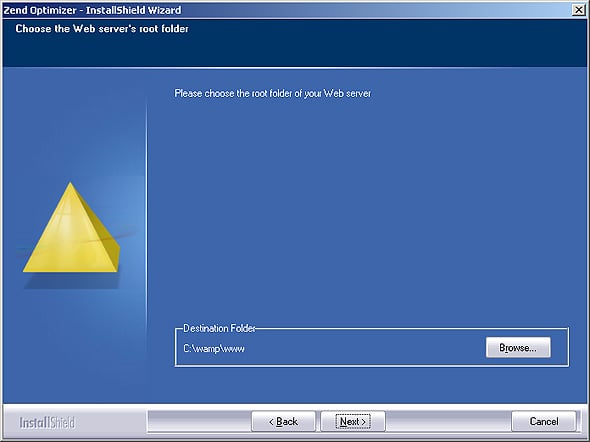
The next step is choosing the root folder of your server. It is placed in the Wamp installation folder under the name of “www”.
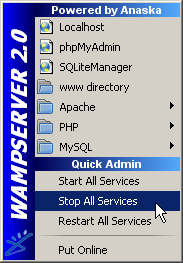
Then you will be asked to stop your server. Click the Wamp icon in the system tray with the left mouse button and choose “Stop All Services”.
Then the install wizard will ask you to start the server. It can be done with the help of the same pop-out menu.
3. Setting up the MotoCMS Control Panel
The Control Panel files are placed in the “for_developerscontrolPanel” folder of the MotoCMS archive. You should extract the controlPanel folder contents to the root folder of your server (“C:wampwww” if you used the default installation path).
Then you should extract the template’s archive contents to the same folder.

Now you can open http://localhost/admin (if you did not change the default “localhost” name) in the browser and perform the activation. More information on the activation can be found here.
As soon as the Control Panel is activated, you can start working with the template!
Your opinion is very important for us. Please leave your feedback and offers regarding the functionality of the Moto Flash CMS as well as your ideas as for new features and options by submitting a request via the ticket system.
There is also an opportunity to try A 30 day FREE Demo. Choose one of Flash Templates from the premium Moto CMS collection and customize it with no limits before the purchase.




[…] Reading: Template From A To Z: the Article is Live This thing was constructed by Scott Petersen. You can follow comments through the RSS 2.0 feed. […]
Thanks, how does this works on Mac (MAMP)? The folders are already different there. Regards.
@CBoerner:
The system works for MAMP the same as for Windows. The instal process is similar to the installation on Windows, but for MAMP there is no need to install Zend Optimizer – it is already included in MAMP’s package. When installing for MAMP, please make sure the PHP 5.2.X version is activated in the server’s settings.
Good news to see it works now with the latest PhP version ! I’m using MotoCMS since 2009 and it’s a real advantage when it comes to build websites quickly !
Best regards,
Florence.