Advanced Contact Form Module: Extended Functionality
Moto CMS is presenting an advanced Contact Form Module with new features and extended functionality. Now your website visitors cannot only input text in the field but also choose a value from the drop-down menu, select an option with the help of a checkbox, and upload files.
We would like to introduce new features and show you how to set up the Contact Form in the Moto Flash CMS control panel. So, let’s open the control panel and discover the new opportunities of the Contact Form.
1. How to Add the Advanced Contact Form
You can find the Advanced Contact Form in the Contact Forms category of the Modules menu. Just select it and add it to the stage.
When it’s added, double-click it to open the editing window. Create new content and specify its name.
The default items will be displayed when the “Add” button is clicked. You can drag and resize them the way you want. The same goes for the buttons and the status message field.
2. Item Types
You can add as many items as you need. There are four item types that can be added to the Advanced Contact Form.
- Text Field
- Select
- CheckBox
- File Upload
Let’s consider each of them.
Text Field
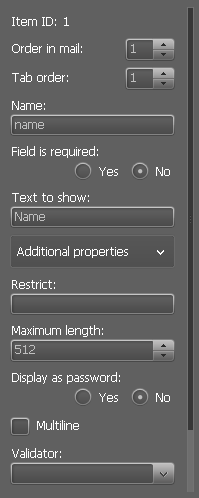
This item type enables text input. Here are the properties that you may set for it:
You can set different orders for this item in the contact form and in the e-mail. It can be set with the help of Order in mail and Tab order properties. The Name property specifies the field’s name in the e-mail, while the Text to show is the field’s name which will be displayed on the website. If you set the field as required, the contact form message won’t be sent before some data is added.
Additional properties let you:
- add symbols that you don’t want to be input;
- set the maximal field length;
- switch the password display mode;
- enable the multiline mode;
- enable validation.
You can choose one of the validation types for the last property:
- String Validator;
- Email Validator;
- Number Validator;
- Date Validator;
Each validator can be customized with the help of additional properties. The validation error messages can be changed in Configuration – Validation Error Messages.
Select
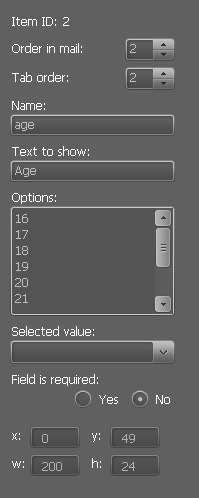
This drop-down menu lets the user select one value from a list. The selected value will be sent in the e-mail. The Select item properties:
The Options property field is multiline, so you can enter as many options as needed. Each option should be added from a new line. The Selected value property lets you choose an option which will be selected in the default state.
CheckBox
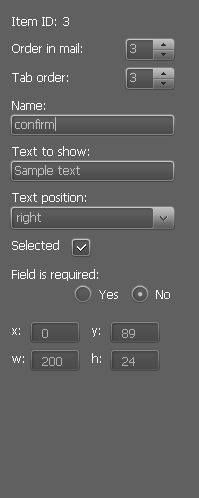
CheckBox lets the user select or deselect a specified option. The email from the contact form will notify whether the option was checked or unchecked. The CheckBox item has the following properties:
The Text position property switches between the right and the left position of the text in relation to the box. The Selected property lets you choose whether the option should be checked in the default state.
File Upload
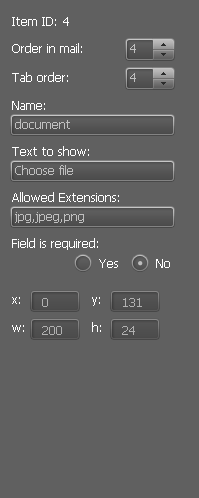
And the last item is the File Upload. It lets the user upload a file, which will be sent as an email attachment. Here are the File Upload item properties:
The Allowed Extensions property lets you specify the file extensions which you allow the users to upload. The extensions should be separated by commas with no spaces. The size of files that can be uploaded is limited by the PHP settings of your server.
3. Form Configuration
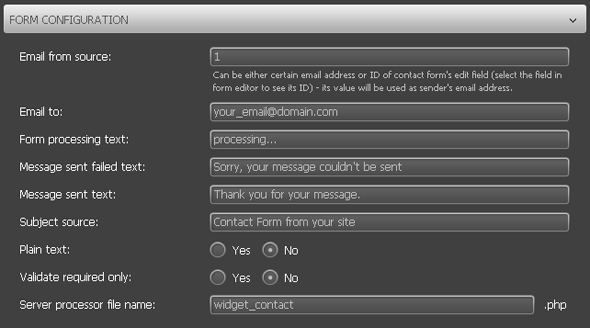
If you press the Configuration button, the Form Configuration window will open.
The main parameter which should be set here is the email address to which the messages will be sent. Also, you can set the status messages, email subject, text format, validation selection, and PHP file name. The last option is for advanced users only.
4. The Contact Form Properties
The list of properties is displayed on the right panel when the Contact Form module is selected on the stage.
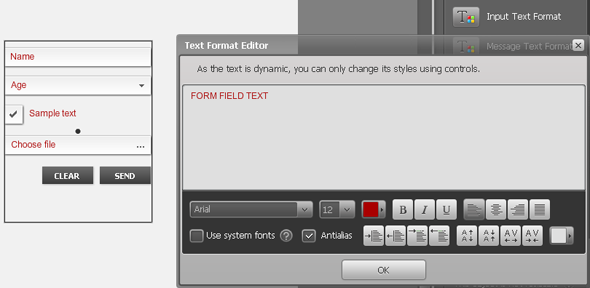
The Input Text Format and the Message Text Format properties let you change the text parameters for the fields and for the status message.
Submit Button Label and Reset Button Labels are the properties which let you set the contact form buttons labels. The Item Style group of properties lets you adjust the contact form fields appearance. The Button Style properties perform the visual adjustments of the contact form buttons.
The widget is available for FREE with the purchase of a Moto CMS standalone version or any premium Flash CMS template from our collection.
Choose one of the Flash CMS templates and register a 30-day DEMO in order to try the Advanced Contact Form Widget in action!
Moto CMS is presenting an advanced contact form module with new features and extended functionality. Now your website visitors get the ability not only to input text in the field, but also to choose a value from the dropdown menu, to select an option with the help of checkbox, and to upload files.
We would like to introduce new features and to show you how to set up the contact form in the Flash CMS control panel. So, let’s open the control panel and discover the new opportunities of the contact form!
1. How to add the Advanced Contact Form.
You can find the Advanced Contact Form in the Contact Forms category of the Modules menu. Just select it and add to the stage.





hi guys , i have bought two templates and i noticed the advance contact widget is not working properly.
i have made all the buttons but every time i press SEND i have “sorry , message could not be send”
also uploading a file icon is not working too .. and at least it should have feed back to the user if he has to wait for the file to upload , specially if its a large file and needs time to upload.
thank you and you are awesome guys
@kayen
Thank you for your question. As a rule, the ‘contact form’ questions need to be solved properly. Please describe your issues by submitting a request to our support team: http://support.cms-guide.com/anonymous_requests/new.
Hi. I have bought a template that has little calendar icons (date selctor) in the reservation form but having started editing have realised these are just png files and not widgets at all. Very misleading. Now trying to figure out if there’s a way to have a date selector button on my form at all. Is there a way?