

Nowadays, we most often discuss the importance of visibility on the global network for every business. However, having a company website may not be enough if your business is a local store or service. Potential customers should be able to find your location easily. Do you think it is enough to simply indicate the line “company address”? How often have you arrived at the wrong place, entering an address into the navigator? And will you waste time trying to determine which store is closer to you by guessing on maps by their addresses? Fortunately, there is a store search function. It is especially interesting for companies with several branches or service points.
If you own a local store and have a website, adding WordPress Location Finder allows you to link your site to your physical location. This way, you can attract new customers. Integrating the WP location feature adds real usefulness and SEO value to any business. But it’s time to move on to practice. In this article, we’ll discuss step-by-step how to set it up to maximize customer experience, integrating a WP location feature adds real utility.
Prerequisites: What You Need Before Installation?
Before installing WP Location Finder, there are a few things you’ll need to prepare for optimal operation of the store locator feature on your WordPress website.
1. Make sure your website is ready
Make sure your site is running the latest version of WordPress, and update it if necessary. Also, make sure you have administrator rights. This will avoid problems when installing the plugin.
2. Prepare the Google Maps API Key
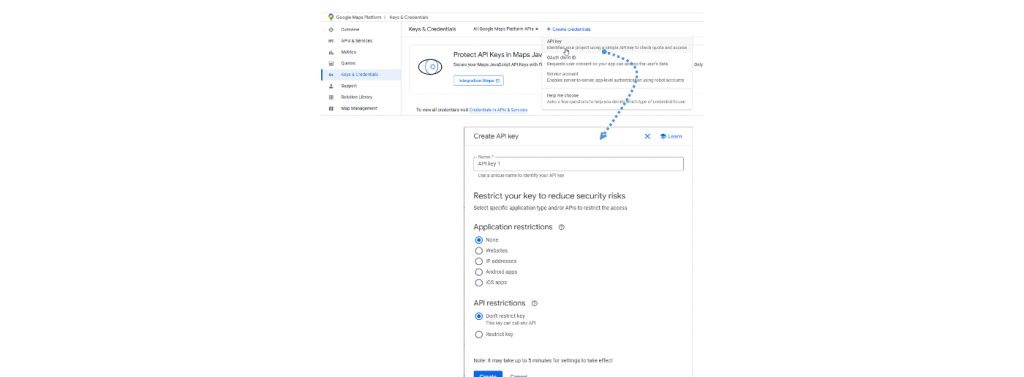
For the map to display and function correctly, you need a Google Maps API key. Here are the steps to get it.
- Open Google Cloud Console, then create or select the project you want to use.
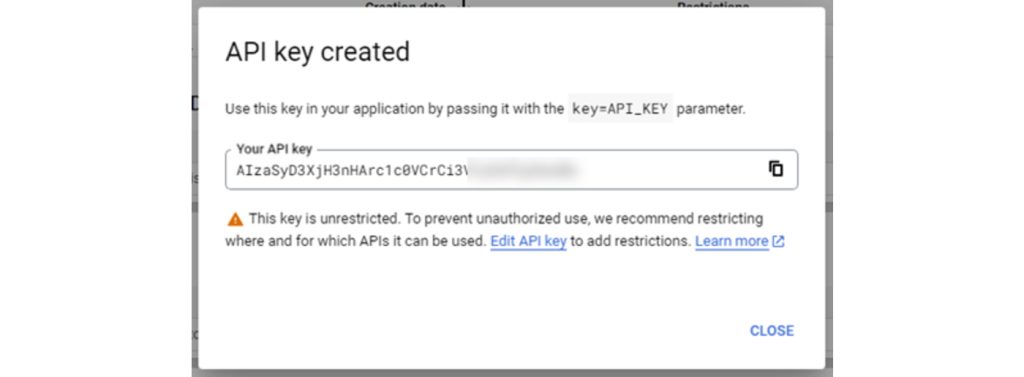
- Click + Create credentials, select API Key, then save the API key that appears.

Next, still in Google Cloud Console, enable the following services so that all map features can run smoothly.
- Maps JavaScript API
- Geocoding API
- Geolocation API
- Places API
- Directions API
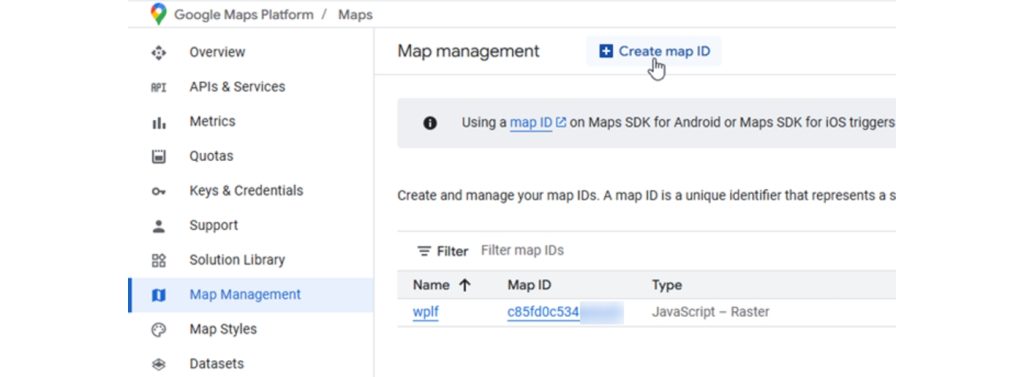
The last step, create a Map ID for map display configuration:
- Open the Map Management page in Google Cloud Console.
- Click Create Map ID, fill in the name and description (optional).
- Select the map type as needed (JavaScript and Raster or Vector), then click Save.
If all these preparations are complete, you are ready to move on to the WP Location Finder installation stage.
Step-by-Step Install WP Location Finder on Your WordPress Site
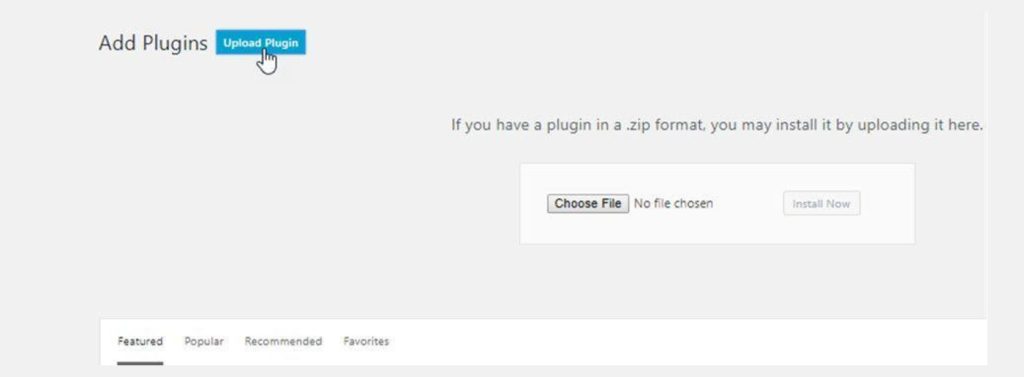
The installation process for WP Location Finder is as simple as adding any other plugin to your WordPress site. In your WordPress dashboard, go to Plugins > Add New, and upload the WP Location Finder plugin .zip file. Once the upload is complete, simply click Activate Plugin to get started.
Once activated, a new menu labelled WP Location Finder will appear on the left side of your dashboard. Before configuring the plugin, ensure you’re logged into your JoomUnited account, this is required to unlock the full set of available features.
Once activated, you will see a new menu on the left side of your dashboard – WP Location Finder. Make sure you are logged into your JoomUnited account; this is necessary to unlock the full set of available features. Then you can proceed to configuring the plugin.

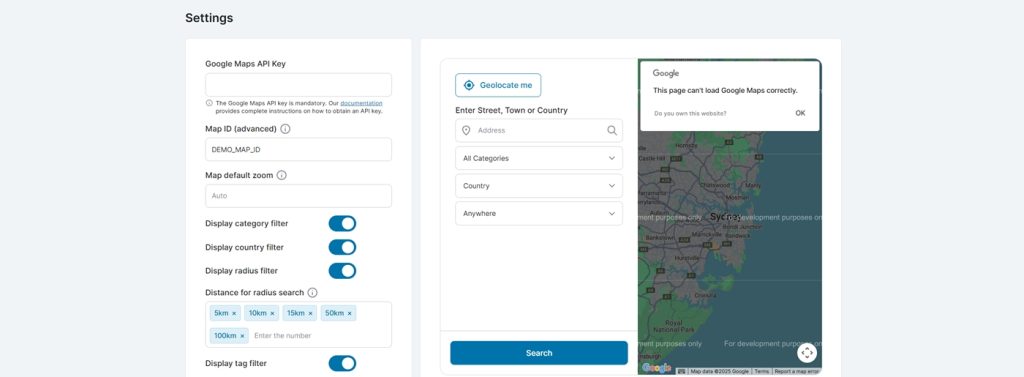
Next, go to WP Location Finder > Settings. You’ll be asked to enter your Google Maps API Key and Map ID, which you should have prepared earlier.
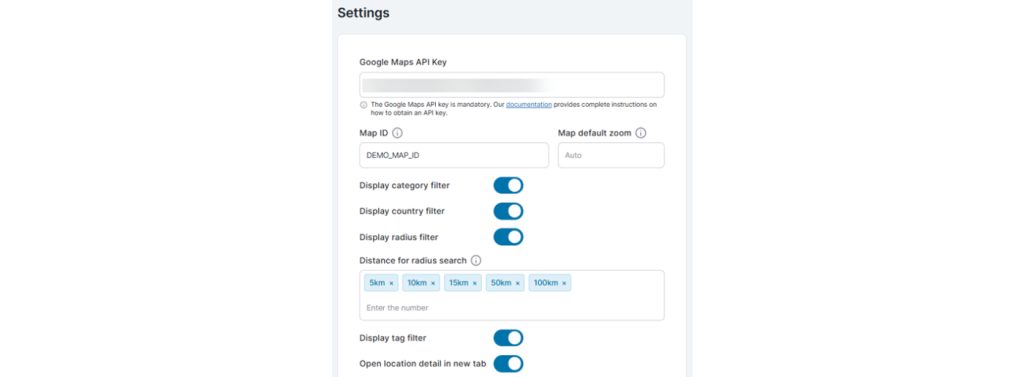
In this same settings area, you can also customize the display settings to match your preferences.
- Set the default zoom level for the map when it loads;
- Show or hide filters such as category, country, radius, or tags;
- Define the default search radius;
- Choose whether location details open in a new tab.
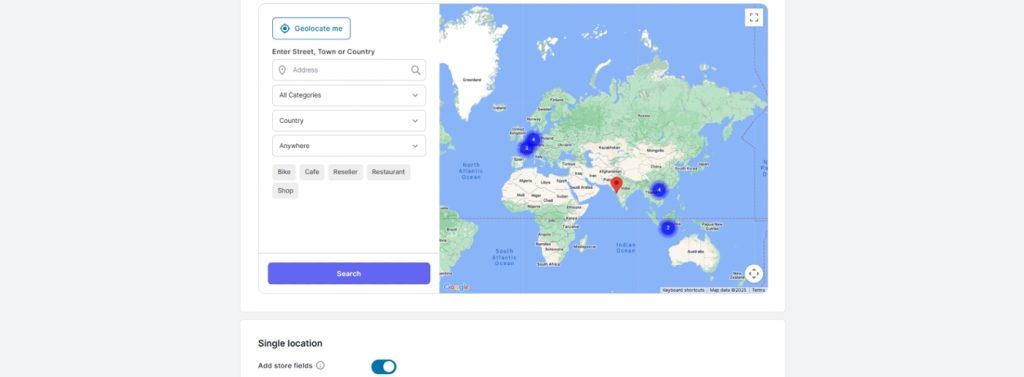
So, all the locations you’ve created with a starting point for searches or automatic detection appear on the interactive map after you’ve saved the settings.
Adding and Managing Locations
Once your plugin setup is complete, it’s time to start adding store locations. But before that, we’ll set up a few things including trying to create new tags and categories.
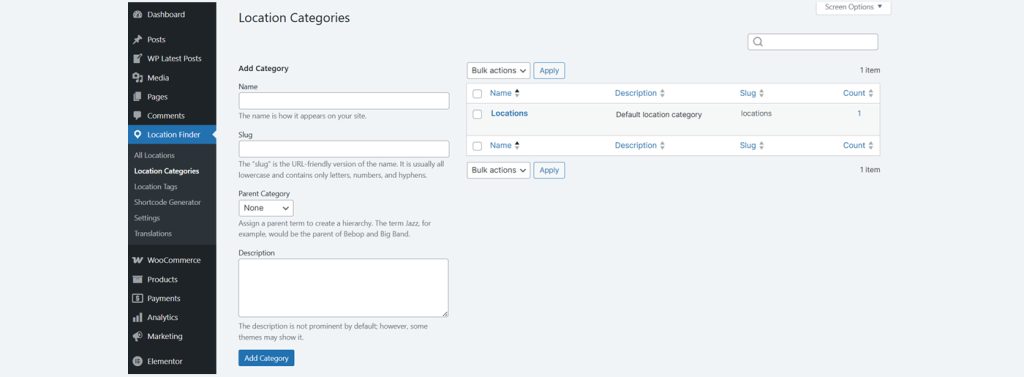
Create New Location Categories
To create a new category simply select Location Finder > Location Categories then fill in the following fields.
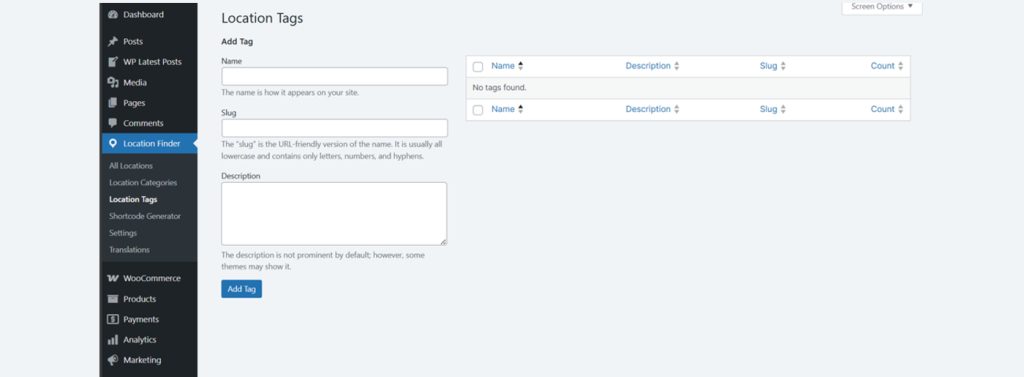
Create New Location Tags
To create a new location tags select Location Finder > Location Tags. Then fill in the following fields Name, Slug, Description.
Create New Location
Next, we will try to create a new location, by selecting All Locations > Add New Location.
The location editor consists of two sections: on the left side, you’ll enter all the location details, and on the right side, a preview map will be displayed according to the data you entered. First, enter the Location Name. Then, input the address. You can enter it manually by clicking on the arrow below the map, opening fields for specifying a detailed address. As an alternative, you can also use Search Address field for for automatic location determination (latitude and longitude).
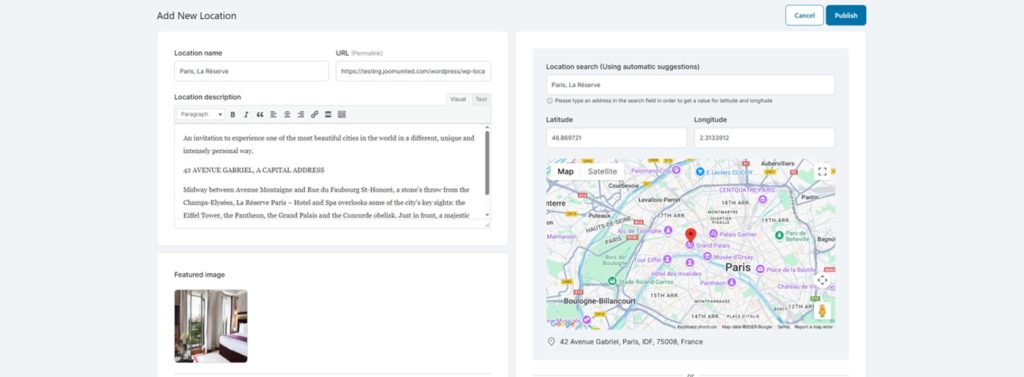
Scroll further down to customize additional settings such as:
- Featured image: Upload a main image to represent the location;
- Image gallery: Add extra images for more visual details;
- Marker icon: Choose a pin icon from the list or upload your own;
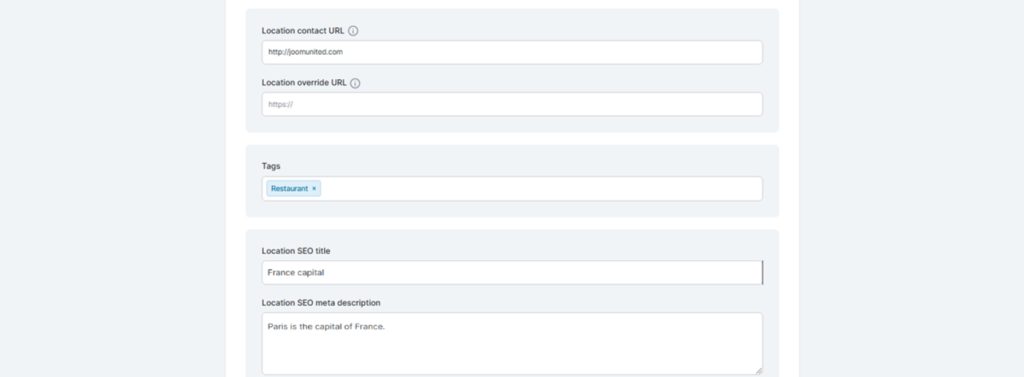
- Contact URL & override URL: Add links for more information or to redirect visitors.
- Tags: Use tags to help categorize and organize your locations;
- SEO settings: Complete the SEO title and meta description to optimize search visibility.

Afterwards, you can assign one or multiple categories to the location to keep everything organized and easier to manage.

Customizing the Map Display
So, you have already set up the location. Pay attention to the appearance of the map. To ensure that it harmonizes with the design of your website, the plugin provides appearance settings. This way, you will support your brand style and impress your visitors.
Adjusting Map Settings to Fit Your Website Design
When WP Location Finder is installed, it allows you to customize the map display. To match your website’s style and provide a better user experience with a personalized look. Go to the Settings menu under Location Finder to start configuring the map. In this section, you can:
- Enter your Google Maps API Key and Map ID to ensure the map loads properly.
- Set the default zoom level so visitors see the map at your preferred scale when the page opens.
- Enable or disable filters such as category, country, radius, and tags, which allow users to easily narrow down their search results.
- Define the distance options for radius search, giving flexibility to your visitors to search within specific ranges like 5km, 10km, 15km, and more.
- Choose whether to open location details in a new tab, ideal if you want to keep the main map page accessible.
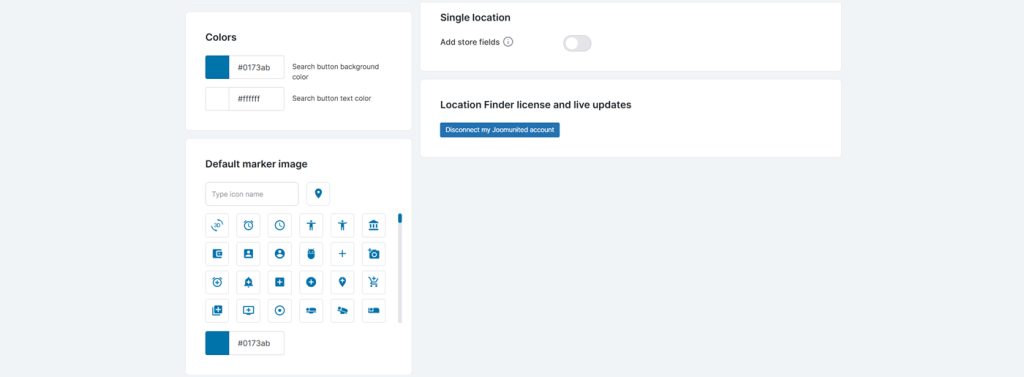
You also have design control over the map elements:
- Customize the search button background and text color to match your site’s branding.
- Set a default marker icon for all locations by selecting from the available icon library or uploading your own, ensuring consistency with your website theme.
With these settings, you can make sure the map not only looks visually appealing but also aligns with your overall website design, creating a seamless experience for your visitors.
Utilizing Shortcodes to Embed Maps on Pages
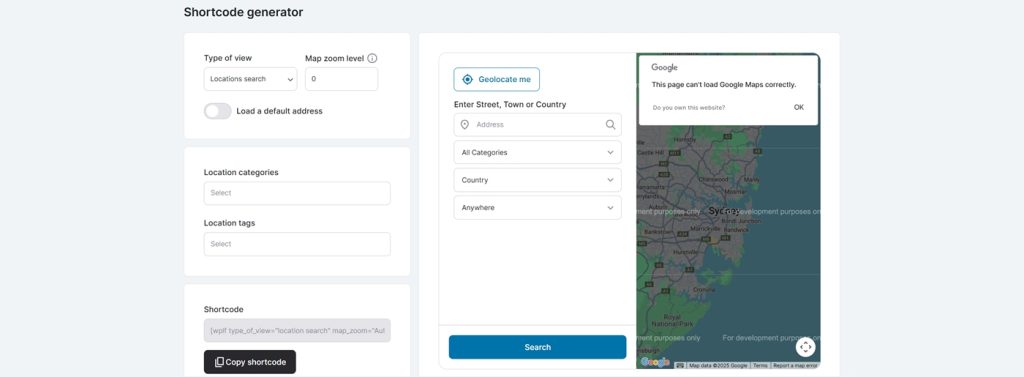
WP Location Finder lets you add interactive maps to any page using shortcodes. You don’t have to touch complicated code, it’s all done with the Shortcode Generator.
Go to Location Finder > Shortcode Generator in your WordPress dashboard. Set up the map view you want. Then generate the shortcode. It’s much easier than developer-level coding. The available features:
- Select the type of view, such as displaying a location search map;
- Set the map zoom level to control how close or far the map appears;
- Optionally, enable Load a default address, which automatically centers the map to a specific location when loaded;
- Filter displayed locations by categories or tags, making it easier to show only relevant locations on specific pages.
Once you have configured the settings, you will find a ready-to-use shortcode at the bottom of the screen. Click on “Copy Shortcode” and add it to the selected area on your site. This can be any page, post or widget area on the site. The map will automatically display based on the settings you have previously selected.
This feature expands the range of options for displaying maps based on various filters or page purposes. As a result, you not only improve the functionality of your page, but also bring additional convenience to the user experience without additional costs for technical improvements.
Testing and Deployment
Don’t skip the testing step. Despite the simple settings, before you give access to the maps to your clients, make sure that your plugin works correctly. Open your site on a computer, tablet, and mobile. See how the map looks on each of them. Test it in different browsers. Check the filters, display location information.
Don’t be lazy to double-check the location data, yes, mistakes sometimes happen. Make sure the addresses, coordinates, and category/tag assignments are accurate. Incorrectly entered data will at best disorient your potential buyers, and at worst, will provide you with a lot of negative reviews. It is also a good idea to test different combinations of filters to see how they affect the search results.
After publishing the store locator, conduct periodic monitoring. Update the information if you open new branches or change addresses. This will ensure that your locator reflects current information without misleading visitors to your site.
Conclusion
If you exist not only online but also in real space, it is important that a potential user can find you. For this purpose, the option of adding a location to the company’s website was invented. With WP Location Finder, you can easily integrate your business location into your WordPress site. This plugin will guide you through all the steps from installation to setting up your store location on the map without any special technical skills. It offers tons of additional features that make the search more convenient for visitors: categories, tags, customizing the map display, etc.
Keep your business information up to date and make any necessary changes. Change of address, add new branches, expand your services, or change the range of products offered. Let potential customers find you and enjoy the results of your efforts.
Learn how to improve a website using AI in our article!