

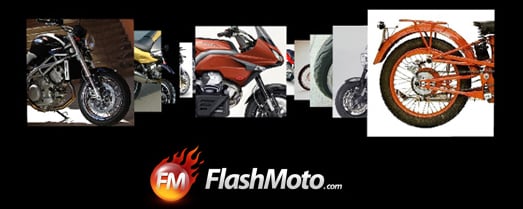
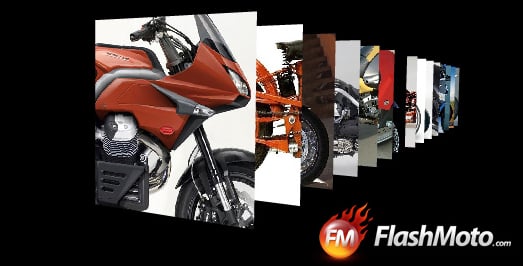
In our previous posts we have considered several examples of creating really cool Flash Galleries with the help of 3D. As promised, today I’ll try to explain how to make papervision gallery. At the end we’ll get something like this – awesome papervision flash gallery. Probably at this stage the gallery looks a bit unfinished, one would wish to add progress bars for the images, image names and descriptions, navigation buttons next & previous, and etc. I’d like to cheer you up by saying it’s just the beginning. In this tutorial we’ll try to write the basics, that is to say an engine for our application. Over the next several steps we’ll add functionality to this gallery. Note we plan to write more tutorials based on this example.
In this tutorial we’ll try to build a Flash Gallery using Papervison 3D. First of all I’d like to mention that the main aim of this article is passing through all stages of flash application development. At the same time we would like to discuss all contradictory questions one may face while working with Papervision 3D. More likely this tutorial will consist of several parts. Together with Papervision 3D library we’ll use Tweener for a better smooth animation and BulkLoader for a better image preloading.
You’ll need this archive in order to through this tutorial. This archive includes all libraries and applications which are necessary for the final swf creation. Flash CS3 or Flex Builder to be exact. If you know what Flex SDK is and you work with its compiler this archive is really useful for you. There is a lot of information regarding Papervision 3d on the net. You can easily find tutorials which teach how to download and install Papervision 3d and other libraries, how to adjust classpaths, and etc. It’s beside our purpose. Simply download this archive. Note you can use its structure and libraries like a start point for the other projects.

Tutorial difficulty level: Basic-Intermediate. We suppose even those of you who are the beginners in Actionscript 3.0 will do this tutorial with awesome results.
One more thing to mention: in this tutorial we deal with the second version of Papervision 3d. Note this version of Papervision 3d hasn’t been released yet.
1. Initial configuration
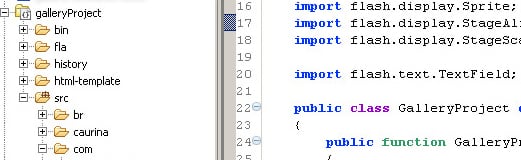
So, at the very beginning you should download papervision gallery source the archive which includes an initial project. Having unpacked the archive you should see the next file structure:
src – all necessary “as” files such as Papervision3d, Tweener and BulkLoader will be stored here. These are the libraries we’ll use in order to create the gallery. All the files we create will be added here as well. Gallery Project is a basic class which is used as Document Class in Flash CS3 and it’s being compiled while creating swf file. So I’ve put it into root. The other files we create for this project will be stored here com/flashmoto/gallery.
fla – this folder will include fla files. It already includes GalleryProject.fla with changed settings: the folder ../src is added to classpath, Document Class is GalleryProject.as
bin – the application called GalleryProject.swf is stored here. All xml files and images that make an application work are kept here as well. Saving your time I’ve already created an xml file with images data. All images are stores in images folder.
For the beginning let’s start compiling the application. As I’ve already mentioned there are two ways of compilation: using Flash CS3 and on your own (means using Flex SDK compiler). As a rule experienced users apply Flex SDK compiler while creating Flash movies. They definitely know what one should do with the source code in order to get a working swf. So I’ll describe how you can compile movie in Flash CS3. To do so I should run GalleryProject.fla from the fla folder and compile the movie having clicked Ctrl+Enter. In the flash output panel you should see something like this – Welcome to our 3D gallery!

2. Problem Description
Let’s build a gallery by following our step-by -step guide. First of all we should decide what to do. So our main tasks are:
– Application Initialization
– Application Initialization
– Loading XML Data
– Loading Images
– 3D Engine Initialization
– 3D Objects Creation
– Adding Objects to the Stage
– Adding Interactivity
3. Application Initialization
Let’s open file named src/GalleryProject.as. If you’ve noticed it is set as the Document Class in publish settings of the fla file. So the code which is inside GalleryProject functon (constructor) runs after the application has been launched. As for the start let’s set some stage properties – align and scaleMode.
package
{
import flash.display.Sprite;
import flash.display.StageAlign;
import flash.display.StageScaleMode;
public class GalleryProject extends Sprite
{
public function GalleryProject()
{
// Set some stage properties
stage.align = StageAlign.TOP;
stage.scaleMode = StageScaleMode.NO_SCALE;
}
}
}
Now we should create another class that will be responsible for gallery creation. It’s the right approach if we want to use it for any of our future applications. Considering the fact that it’ll be an ordinary Sprite we can add it anywhere using addChild() method. We can also change different parameters for its positioning.
Let’s create class called Gallery.as in the src/com/flashmoto/gallery folder. At first it will look this way.
package com.flashmoto.gallery
{
public class Gallery extends Sprite
{
/**
* Gallery Constructor
*/
public function Gallery()
{
}
}
}
And we can now add the gallery to our application. To accomplish this we should add some lines to our main file called GalleryProject.as:
package
{
import com.flashmoto.gallery.Gallery;
import flash.display.Sprite;
import flash.display.StageAlign;
import flash.display.StageScaleMode;
public class GalleryProject extends Sprite
{
public function GalleryProject()
{
// Set some stage properties
stage.align = StageAlign.TOP;
stage.scaleMode = StageScaleMode.NO_SCALE;
// Create gallery
var gallery:Gallery = new Gallery();
addChild( gallery );
}
}
}
All changes are marked with bold type. I always dislike when tutorials which include source code write new lines or code changes separately from the whole class which requires these changes.) It’s always confusing and time taking process to deal with such code. I prefer using more traffic but seeing how the source code receives new functions and expressions with every step I make.
In order to use Gallery class we need to import it first. If you want to make sure that the code is working and the gallery has been really added you can write trace (‘This is your gallery’) into the gallery class constructor and you’ll see this message in the flash output panel.
Ok, let’s go to the next stage.
4. Loading XML Data
Now we should get information regarding images and where they should be taken from for download. Of course there is a simpler way to define them as constants directly in our code. Though, this way isn’t very flexible. So all information will be stored in XML file. (If you want to read more about this format you should read Wiki! 


For xml file and images loading I’ll use BulkLoader. Let’s add a few function called loadImagesData() which will be called from the Gallery constructor. In this function we’ll initialize a new loader. Having added our xml file to this loader we’ll start to load images and listen for the loader’s progress, complete and error events. After you make the changes the class will look like this. As you’ve probably noticed a lot of new features and functions has appeared. I did my best to write the comprehensive comments for each feature and function, and in front of every line. So I don’t think it’s necessary to describe them in a more detailed way. Just have a look at the code we’ve created.
package com.flashmoto.gallery
{
import br.com.stimuli.loading.BulkErrorEvent;
import br.com.stimuli.loading.BulkLoader;
import br.com.stimuli.loading.BulkProgressEvent;
import flash.display.Sprite;
import flash.events.Event;
public class Gallery extends Sprite
{
/**
* Loader for the gallery xml and gallery images
*/
public var loader:BulkLoader;
/**
* Collection of images urls
*/
public var galleryImagesCollection:Array;
/**
* Flag that indicates if xml is loaded
*/
private var _galleryXMLLoaded:Boolean = false;
/**
* Path to the gallery xml file
*/
public static const GALLERY_XML:String = ‘xml/gallery.xml’;
/**
* Gallery Constructor
*/
public function Gallery()
{
// Load images data
loadImagesData();
}
/**
* Loads images data from xml file.
*/
private function loadImagesData():void
{
// Create new loader
loader = new BulkLoader( ‘galleryLoader’ );
// Loader events
loader.addEventListener(BulkLoader.COMPLETE,
onGalleryLoaded);
loader.addEventListener(BulkLoader.PROGRESS,
onGalleryLoadingProgress);
loader.addEventListener(BulkErrorEvent.ERROR,
onGalleryLoadingError);
// Add gallery xml to the quenue
loader.add( GALLERY_XML );
// Start loading
loader.start();
}
/**
* Parses gallery xml file and starts images loading process.
*/
private function onGalleryLoaded( event:Event ):void
{
// Start loading images
}
/**
* Shows loader progress info.
*/
private function onGalleryLoadingProgress(
event:BulkProgressEvent ):void
{
// Show gallery xml loading progress
trace( ‘Loading XML: ‘ + event.percentLoaded*100 + ‘%’ );
}
/**
* Shows loader error info.
*/
private function onGalleryLoadingError(
event:BulkErrorEvent ):void
{
trace( ‘ERROR: Data xml loading failed.’ )
}
}
}
5. Loading Images
Now we have all image files paths. So we can load images. We have two variants to load images – loading all the images and then adding them to the stage or making the user tired showing a procedure of image load. For the beginning we’ll follow an easier way and choose the first variant. We’ll add several lines to the methods we already have. Now we should parse loaded xml, choose image file paths and upload the images. Loading status information can be received via onGalleryLoadingProgress method. At this very stage I’ve simply traced this information to the output panel.
package com.flashmoto.gallery
{
// Import statements ...
public class Gallery extends Sprite
{
/**
* Loader for the gallery xml and gallery images
*/
public var loader:BulkLoader;
/**
* Collection of images urls
*/
public var galleryImagesCollection:Array;
/**
* Flag that indicates if xml is loaded
*/
private var _galleryXMLLoaded:Boolean = false;
/**
* Path to the gallery xml file
*/
public static const GALLERY_XML:String = ‘xml/gallery.xml’;
/**
* Gallery Constructor
*/
public function Gallery()
{
// Load images data
loadImagesData();
}
/**
* Loads images data from xml file.
*/
private function loadImagesData():void
{
…
}
/**
* Parses gallery xml file and starts images loading process.
*/
private function onGalleryLoaded( event:Event ):void
{
if( !_galleryXMLLoaded ) {
// Parse loaded gallery xml
galleryImagesCollection = new Array();
var galleryImagesData:XML = loader.getXML(
GALLERY_XML, true );
for each ( var image:XML in
galleryImagesData.elements() ) {
var imageSrc:String = image.@src.toString();
if( imageSrc && imageSrc.length > 0 ) {
galleryImagesCollection.push( imageSrc );
loader.add( imageSrc );
}
}
_galleryXMLLoaded = true;
// Start loading images
loader.start();
} else {
// TODO: Init 3D components
}
}
/**
* Shows loader progress info.
*/
private function onGalleryLoadingProgress(
event:BulkProgressEvent ):void
{
if( !_galleryXMLLoaded ) {
// Show gallery xml loading progress
trace( ‘Loading XML: ‘ +
event.percentLoaded*100 + ‘%’ );
} else {
// Show images loading progress
trace( ‘Loading image: ‘ + event.itemsLoaded + ‘/’ +
event.itemsTotal + ‘,
‘ + event.percentLoaded*100 + ‘%’ );
}
}
/**
* Shows loader error info.
*/
private function onGalleryLoadingError(
event:BulkErrorEvent ):void
{
if( !_galleryXMLLoaded ) {
trace( ‘ERROR: Data xml loading failed.’ )
} else {
trace( ‘ERROR: Images loading failed.’ )
}
}
}
}
So we are close to Papervision3d. Let’s start…
6. 3D Engine Initialization
In order to use Papervision3d while moving objects in 3d space we should initialize 3D engine first and create all necessary flash components such as viewport, camera, scene and renderer. Let’s write a new function called init3DEngine(). We’ll write a new function named init3DEngine() which will be called in onGalleryLoaded() method after the download has been finished.
package com.flashmoto.gallery
{
// Import statements ...
public class Gallery extends Sprite
{
/**
* Loader for the gallery xml and gallery images
*/
public var loader:BulkLoader;
/**
* Papervision3d components – Viewport
*/
public var viewport:Viewport3D;
/**
* Papervision3d components – Scene
*/
public var scene:Scene3D;
/**
* Papervision3d components – Camera
*/
public var camera:Camera3D;
/**
* Papervision3d components – BasicRenderEngine
*/
public var renderer:BasicRenderEngine;
/**
* Collection of images urls
*/
public var galleryImagesCollection:Array;
/**
* Flag that indicates if xml is loaded
*/
private var _galleryXMLLoaded:Boolean = false;
/**
* Path to the gallery xml file
*/
public static const GALLERY_XML:String = ‘xml/gallery.xml’;
/**
* Viewport width
*/
public static const VIEWPORT_WIDTH:Number = 800;
/**
* Viewport height
*/
public static const VIEWPORT_HEIGHT:Number = 800;
/**
* Gallery Constructor
*/
public function Gallery()
{
// Load images data
loadImagesData();
}
/**
* Loads images data from xml file.
*/
private function loadImagesData():void
{
…
}
/**
* Parses gallery xml file and starts images loading process.
*/
private function onGalleryLoaded( event:Event ):void
{
if( !_galleryXMLLoaded ) {
// Parse loaded gallery xml
galleryImagesCollection = new Array();
var galleryImagesData:XML = loader.getXML(
GALLERY_XML, true );
for each ( var image:XML in
galleryImagesData.elements() ) {
var imageSrc:String = image.@src.toString();
if( imageSrc && imageSrc.length > 0 ) {
galleryImagesCollection.push( imageSrc );
loader.add( imageSrc );
}
}
_galleryXMLLoaded = true;
// Start loading images
loader.start();
} else {
// Init 3D components
init3DEngine();
}
}
/**
* Shows loader progress info.
*/
private function onGalleryLoadingProgress(
event:BulkProgressEvent ):void
{
…
}
/**
* Shows loader error info.
*/
private function onGalleryLoadingError(
event:BulkErrorEvent ):void
{
…
}
/**
* Inits 3D engine. Creates viewport, scene, camera and
* renderer and also creates and adds scene objects.
* Creates event listener for the enter frame event for
* the scene rendering.
*/
private function init3DEngine():void
{
// Create viewport
viewport = new Viewport3D( VIEWPORT_WIDTH,
VIEWPORT_HEIGHT, false, true );
addChild( viewport );
// Create scene
scene = new Scene3D();
// Create camera and set its zoom and focus
camera = new Camera3D();
camera.zoom = 5;
camera.focus = 100;
// Create BasicRenderEngine
renderer = new BasicRenderEngine();
}
}
}
As you can see some new features including two constants such as VIEWPORT_WIDTH and VIEWPORT_HEIGHT have been added. These constants define render area. Seems it would be better to define them while creating Gallery object. I think we’ll correct it a bit later. The case is that at this stage we have the other tasks. The same relates to other engine configurations such as camera zoom and focus, viewport scaling and interactivity. It would be better to change them dynamically from an external text file. I think we’ll do it for sure.
7. 3D Objects Creation
Now we should create objects in order to add them to the stage. Of course we could add them at once. It would make the code simpler but we’ll not go this way. One should understand that the application gains its flexibility thanks to dynamic object placement. So I recommend separating these two actions from the very beginning. At first we’ll create objects and then set their positions. For this we should update our class a little bit:
package com.flashmoto.gallery
{
// Import statements ...
public class Gallery extends Sprite
{
…
/**
* Collection of images urls
*/
public var galleryImagesCollection:Array;
/**
* Collection of gallery planes to be added to the scene
*/
public var galleryPlanesCollection:Array;
/**
* Flag that indicates if xml is loaded
*/
private var _galleryXMLLoaded:Boolean = false;
…
/**
* Gallery Constructor
*/
public function Gallery()
{
// Load images data
loadImagesData();
}
/**
* Loads images data from xml file.
*/
private function loadImagesData():void
{
…
}
/**
* Parses gallery xml file and starts images loading process.
*/
private function onGalleryLoaded( event:Event ):void
{
…
}
/**
* Shows loader progress info.
*/
private function onGalleryLoadingProgress(
event:BulkProgressEvent ):void
{
…
}
/**
* Shows loader error info.
*/
private function onGalleryLoadingError(
event:BulkErrorEvent ):void
{
…
}
/**
* Inits 3D engine. Creates viewport, scene, camera and
* renderer and also creates and adds scene objects.
* Creates event listener for the enter frame event for
* the scene rendering.
*/
private function init3DEngine():void
{
// Create viewport
viewport = new Viewport3D( VIEWPORT_WIDTH,
VIEWPORT_HEIGHT, false, true );
addChild( viewport );
// Create scene
scene = new Scene3D();
// Create camera and set its zoom and focus
camera = new Camera3D();
camera.zoom = 5;
camera.focus = 100;
// Create BasicRenderEngine
renderer = new BasicRenderEngine();
// Create Gallery Planes
createGalleryImages();
}
/**
* Creates display objects from loaded images and updates
* gallery objects collection.
*/
private function createGalleryImages():void
{
galleryPlanesCollection = new Array();
// Go through all images and create planes
for( var i:uint=0; i
var galleryPlane:DisplayObject3D =
createGalleryDisplayObject(
galleryImagesCollection[i] );
// Add plane to collection
galleryPlanesCollection.push( galleryPlane );
}
}
/**
* Creates gallery 3D object using loaded image bitmap.
*
* The method returns DisplayObject3D object, and gallery
* do not need to know if there is a plane, cube or sphere,
* so later I can rewrite this method to create any objects
* needed.
*/
private function createGalleryDisplayObject(
image:String ):DisplayObject3D
{
// Get loaded image bitmap using loader getBitmap method
var bitmap:Bitmap = loader.getBitmap( image );
var bitmapHolder:Sprite = new Sprite();
bitmapHolder.addChild( bitmap );
// Create movie material for the plane
var material:MovieMaterial =
new MovieMaterial(bitmapHolder);
// Use new material rect property to crop image if it is
// larger that plane’s dimensions
material.rect = new Rectangle( 0, 0, GALLERY_PLANE_WIDTH,
GALLERY_PLANE_HEIGHT );
// Make material double sided and interactive
material.doubleSided = true;
material.interactive = true;
// Create and return plane
return new Plane( material, GALLERY_PLANE_WIDTH,
GALLERY_PLANE_HEIGHT, GALLERY_PLANE_SEGMENTS_W,
GALLERY_PLANE_SEGMENTS_H );
}
}
}
As you see a method called createGalleryDisplayObject() creates a 3D object and this objects isn’t for sure a Plane. It can be any object. So in a case we wish to draw spheres instead of planes we’ll basically have to rewrite this method.
8. Adding Objects to the Stage
As I’ve already mentioned I comment the code without explaining what should be done and how to do it because our code already goes with comprehensive comments. Almost every code line has its own description. So read the code attentively and comment this tutorial in a case you have any questions. I’ll be more than happy to answer your questions.
So we have a collection of 3D objects which can be added to the stage and placed in a way we wish. In the future I plan to update this example in order to develop several image placement strategies. So we could dynamically change the gallery appearance. At the first stage you can see the first variant: I’ve placed images one by one. Let’s add new method called addGalleryImages()
package com.flashmoto.gallery
{
// Import statements ...
public class Gallery extends Sprite
{
…
/**
* Collection of gallery planes to be added to the scene
*/
public var galleryPlanesCollection:Array;
/**
* Collection of scene gallery planes
*/
public var galleryPlanes:Array;
/**
* Flag that indicates if xml is loaded
*/
private var _galleryXMLLoaded:Boolean = false;
/**
* Holder for the gallery planes
*/
private var _planesHolder:DisplayObject3D;
/**
* Path to the gallery xml file
*/
public static const GALLERY_XML:String = ‘xml/gallery.xml’;
…
/**
* Gallery Constructor
*/
public function Gallery()
{
// Load images data
loadImagesData();
}
/**
* Loads images data from xml file.
*/
private function loadImagesData():void
{
…
}
/**
* Parses gallery xml file and starts images loading process.
*/
private function onGalleryLoaded( event:Event ):void
{
…
}
/**
* Shows loader progress info.
*/
private function onGalleryLoadingProgress(
event:BulkProgressEvent ):void
{
…
}
/**
* Shows loader error info.
*/
private function onGalleryLoadingError(
event:BulkErrorEvent ):void
{
…
}
/**
* Inits 3D engine. Creates viewport, scene, camera and
* renderer and also creates and adds scene objects.
* Creates event listener for the enter frame event for
* the scene rendering.
*/
private function init3DEngine():void
{
// Create viewport
viewport = new Viewport3D( VIEWPORT_WIDTH,
VIEWPORT_HEIGHT, false, true );
addChild( viewport );
// Create scene
scene = new Scene3D();
// Create camera and set its zoom and focus
camera = new Camera3D();
camera.zoom = 5;
camera.focus = 100;
// Create BasicRenderEngine
renderer = new BasicRenderEngine();
// Create Gallery Planes
createGalleryImages();
// Add Gallery Planes to the scene
addGalleryImages();
}
/**
* Creates display objects from loaded images and updates
* gallery objects collection.
*/
private function createGalleryImages():void
{
…
}
/**
* Creates gallery 3D object using loaded image bitmap.
*
* The method returns DisplayObject3D object, and gallery
* do not need to know if there is a plane, cube or sphere,
* so later I can rewrite this method to create any objects
* needed.
*/
private function createGalleryDisplayObject(
image:String ):DisplayObject3D
{
…
}
/**
* Adds gallery display objects to the scene and arranges
* them. Later I will add more arrangent strategies to
* this application, and all I need to do is to update
* this method which will get the stategy name as
* parameter.
*/
private function addGalleryImages():void
{
// Create holder for the gallery objects
_planesHolder = new DisplayObject3D();
scene.addChild( _planesHolder );
galleryPlanes = new Array();
// Add gallery planes
var flag:int = 1;
for( var i:uint=0; i
var galleryPlane:Plane = galleryPlanesCollection[i]
as Plane;
galleryPlane.z = _firstPlaneZ + i*200;
galleryPlane.x = 5000*flag;
galleryPlanes.push(_planesHolder.addChild(
galleryPlane));
flag *= -1;
Tweener.addTween( galleryPlane, {
x: 0,
time:2*(galleryPlanesCollection.length-i)/20+1,
transition:”easeOutBack”
} );
}
}
}
}
9. Adding Interactivity
The last thing that should be added is interactivity. Seems it should be described in detail.
The first thing you should do to see the objects that have been added to the stage is rendering the stage. In Papervision3d you can do it with this code
renderer.renderScene( scene, camera, viewport );
as you see all 3D engine elements are activated in this code. Having executed this code you’ll see what is added to your stage. However you should remember one thing – without calling this method you won’t see such changes as:
– changing object location or object properties;
– changing camera position or rotation;
– refreshing something.
Basically it’s called on every onEnterFrame event, but it’s sometimes difficult for browser to accomplish this. Especially if you have a lot of objects and refining or you need fast rendering and good quality graphics.) So Flash developers find various ways to optimize the application. Having analyzed different requirements they define if a stage should be rendered at the moment or not. If to speak about our example the stage should be rendered every moment because our main aim is camera and mouse interaction. So we should continually refresh the image. In the future I’ll add a requirement to avoid such rendering. For instance in a case we’ve clicked the first image and it has been enlarged.
Papervision uses InteractiveScene3DEvent in order to respond to such mouse events as hitting, pointing and tracking. Note if you want these events work the object material and viewpoint should be interactive.
Material has an interactive feature to accomplish this
material.interactive = true;
Viewport has this feature as well. We set its value while creating – the 4th parameter = true
viewport = new Viewport3D(VIEWPORT_WIDTH, VIEWPORT_HEIGHT, false, true);
Of course adding interactivity isn’t limited to listening for the mouse events only. It also includes response to these events. This is the way logic is added to the code. Note logic is an inseparable part of the application.
It’s time for the most interesting part which can be difficult for an ordinary animator. So this part is usually done by a Flash programmer. Considering the fact that our tutorial relates to Papervision 3d I suggest you to explore application logic by yourself. Note all application logic is described in event listener handlers such as onPlanePress(), onPlaneOver(), onPlaneOut(). Camera moving logic is described in render() method.
Here is the final code. Let’s try to compile it. You should succeed!
package com.flashmoto.gallery
{
// Import statements ...
public class Gallery extends Sprite
{
…
/**
* Holder for the gallery planes
*/
private var _planesHolder:DisplayObject3D;
/**
* Flag that indicates zoomed image state
*/
private var _imageZoomed:Boolean = false;
/**
* Current plane ( first in the line ) index
*/
private var _currentPlaneIndex:uint = 0;
/**
* First plane z coordinate, planes shift
*/
private var _firstPlaneZ:Number = 0;
/**
* Flag that indicates if planes are moving
*/
private var _planesAreMoving:Boolean = false;
/**
* Path to the gallery xml file
*/
public static const GALLERY_XML:String = ‘xml/gallery.xml’;
…
/**
* Gallery Constructor
*/
public function Gallery()
{
// Load images data
loadImagesData();
}
/**
* Loads images data from xml file.
*/
private function loadImagesData():void
{
…
}
/**
* Parses gallery xml file and starts images loading process.
*/
private function onGalleryLoaded( event:Event ):void
{
…
}
/**
* Shows loader progress info.
*/
private function onGalleryLoadingProgress(
event:BulkProgressEvent ):void
{
…
}
/**
* Shows loader error info.
*/
private function onGalleryLoadingError(
event:BulkErrorEvent ):void
{
…
}
/**
* Inits 3D engine. Creates viewport, scene, camera and
* renderer and also creates and adds scene objects.
* Creates event listener for the enter frame event for
* the scene rendering.
*/
private function init3DEngine():void
{
// Create viewport
viewport = new Viewport3D( VIEWPORT_WIDTH,
VIEWPORT_HEIGHT, false, true );
addChild( viewport );
// Create scene
scene = new Scene3D();
// Create camera and set its zoom and focus
camera = new Camera3D();
camera.zoom = 5;
camera.focus = 100;
// Create BasicRenderEngine
renderer = new BasicRenderEngine();
// Create Gallery Planes
createGalleryImages();
// Add Gallery Planes to the scene
addGalleryImages();
// Render the scene every enter frame
addEventListener( Event.ENTER_FRAME, render );
}
/**
* Creates display objects from loaded images and updates
* gallery objects collection.
*/
private function createGalleryImages():void
{
…
}
/**
* Creates gallery 3D object using loaded image bitmap.
*
* The method returns DisplayObject3D object, and gallery
* do not need to know if there is a plane, cube or sphere,
* so later I can rewrite this method to create any objects
* needed.
*/
private function createGalleryDisplayObject(
image:String ):DisplayObject3D
{
…
}
/**
* Adds gallery display objects to the scene and arranges
* them. Later I will add more arrangent strategies to
* this application, and all I need to do is to update
* this method which will get the stategy name as
* parameter.
*/
private function addGalleryImages():void
{
// Create holder for the gallery objects
_planesHolder = new DisplayObject3D();
scene.addChild( _planesHolder );
galleryPlanes = new Array();
// Add gallery planes
var flag:int = 1;
for( var i:uint=0;
i
var galleryPlane:Plane =
galleryPlanesCollection[i] as Plane;
galleryPlane.z = _firstPlaneZ + i*200;
galleryPlane.x = 5000*flag;
galleryPlanes.push( _planesHolder.addChild(
galleryPlane ) );
flag *= -1;
Tweener.addTween( galleryPlane, {
x: 0,
time:2*(galleryPlanesCollection.length-i)/20+1,
transition:”easeOutBack”
} );
}
// Listen for the events only from the first
// gallery object
galleryPlane =
galleryPlanes[_currentPlaneIndex] as Plane;
galleryPlane.addEventListener(
InteractiveScene3DEvent.OBJECT_PRESS,
onPlanePress );
galleryPlane.addEventListener(
InteractiveScene3DEvent.OBJECT_OVER,
onPlaneOver );
galleryPlane.addEventListener(
InteractiveScene3DEvent.OBJECT_OUT,
onPlaneOut );
}
/**
* Gallery plane mouse over event handler
*/
private function onPlaneOver(
event:InteractiveScene3DEvent ):void
{
// Check for the app state
if( !_imageZoomed && !_planesAreMoving ) {
// Tween plane
var plane:Plane = event.target as Plane;
Tweener.addTween( plane, {
z: _firstPlaneZ-200,
time:2,
transition:”easeInSin”
} );
}
}
/**
* Gallery plane mouse out event handler
*/
private function onPlaneOut(
event:InteractiveScene3DEvent ):void
{
// Check for the app state
if( !_imageZoomed && !_planesAreMoving ) {
// Tween plane
var plane:Plane = event.target as Plane;
Tweener.addTween( plane, {
z: _firstPlaneZ,
time:2,
transition:”easeInSin”
} );
}
}
/**
* Renders the scene.
*/
private function render( event:Event ):void
{
// Check for the zoomed image state
if( !_imageZoomed ) {
// Calculate distances
var xDist:Number =
root.mouseX – stage.stageWidth * 0.5;
var yDist:Number =
root.mouseY – stage.stageHeight * 0.5;
var newDist:Number = Math.round(
Math.sqrt(xDist*xDist + yDist*yDist) ) * 0.08;
// Calculate camera rotation values
var cameraRotationX : Number = -xDist * 0.1;
var cameraRotationY : Number = yDist * 0.1;
var cameraRotationZ : Number = (xDist*yDist >= 0)
? -Math.abs(newDist*0.1) :
Math.abs(newDist*0.1);
// Tween camera
Tweener.addTween( _planesHolder, {
x: xDist,
y: yDist,
rotationY : cameraRotationX,
rotationX : cameraRotationY,
rotationZ : cameraRotationZ,
time:1.2,
transition:”easeOutCubic”
} );
}
// Render the scene
renderer.renderScene( scene, camera, viewport );
}
}
}
Please let me know if you have any questions regarding this tutorial. I’ll be pleased to answer them.
10. Conclusion
So we’ve finished a first pass through creating an interactive Papervision Flash Gallery. If you are the beginner I advise you to download the source project and follow it step-by-step. Though, in a case you are an experienced user you can download the complete sources for the gallery.


This tutorial we’ll be of a great help for us in the future. It’ll help us explore the other 3D engine features. Also, I’d like to explore some ways to optimize Papervison3d applications and make them work faster. I plan to learn different ways of image positioning, navigation, dynamic gallery appearance and logic changing, creating reflections, mouse wheel navigation, and etc. New tutorials are waiting for you in the nearest future.